Discount [SINTRON High Accuracy DIY 3D Printer full complete Kit for Reprap Prusa i3 MK3 heatbedLCD 2004 M
New [SINTRON High Accuracy DIY 3D Printer full complete Kit for Reprap Prusa i3 MK3 heatbedLCD 2004 M
Check out our sale items [SINTRON High Accuracy DIY 3D Printer full complete Kit for Reprap Prusa i3 MK3 heatbedLCD 2004 M and enjoy release normal Shipping on
Shop our [SINTRON High Accuracy DIY 3D Printer full complete Kit for Reprap Prusa i3 MK3 heatbedLCD 2004 M with price US $359.95 , And get 0%OFF
[Sintron HDMI VGA Audio Universal LCD TV Monitor Screen Controller Driver Board PC/VGA/HDMI/USB Interface Kit Replace V56 V29
[32298335053
[SINTRON 3D Printer full complete Kit for Reprap Prusa i3 ,MK3 heatbed,LCD 2004 , MK8 extruder
Purchase history &Feedback on Ebay
---------------------------------------------------------------------------------------------------------------------------------------------------
http://youtu.be/qWkeZWJBWt8
http s://w ww.youtube.com/watch?v=V-MTabg3bYw&feature=youtu.be
https://www.youtube.com/watch?v=Ch6YRtvhw8k&feature=youtu.be
https://www.youtube.com/watch?v=CDDk8Y8z3hs&feature=youtu.be
htt ps://w ww.youtube.com/watch?v=Ni7wXt7Cr_k from customer : rowing-gumby
http://www.lincade.org/review-and-build-instructions-for-the-sintron-reprap-prusa-i3/
https://www.youtube.com/watch?v=dk9CACwla2s
https://youtu.be/BPIrlvvLZWE
https://www.3dprintersonlinestore.com/super-smart-prusa-i3
Please pay more patience,here are thedetails about Prusa i3 3D Printer,its very helpful before your purchase.
Overview :
This kit includeall the parts you needfor building Reprap prusa i3 3D printer . you might be wonderingwhat are the difference between ours and others.
the main difference would be :
1. we don't adapt wade extruder , weupgrade the J-head to All metal MK8 extruder.
if you use wade extruder etc.. every time when you change the filament , you have to take them apart and calibrate it all again . it takes hours sometimes . so i would suggest you to use long distance extruder as below . it takes you only within 1 minute to change the filament . ( how long will we change the filament ? for normal use , you would change it at least 3~5 times per month . i believe you don't want to spend hours every time )
2.we offer LCD 2004 controller for off line printing( believe me , you don't want to spare one computer for your 3D printer use only )
3. we use the latestMK3 heatbed, which is later version of MK2B , 24V and 12V are both ok ,with aluminum plate , this would reduct your calibration time a lot !
actually we have own this products for over half year , but we just started to sell it now . because we hope to went through all the details , and make sure all the components we selected are really useful , so customer can save time on worrying if it's the hardware problem and focus on project only.
therefore , if you meet any problems ( i am sure you will meet dozens of problems and questions during the building process , and it's normal ) , you can always contact us for technical support , because almost all the problems you will meet , we already met before ,you are not just buying this kit , you also get our experienced support for you . building a 3D printer is not an easy job , so if there's some one you can ask , you will save a lot of time.
we also provide firmware for you , you can also ask us to pre-install the firmware for you . so even you know nothing about firmware , you can still get it working . error range would be from 0.1~0.5mm ( but in order to be more precise , some knowledge about the firmware is recommended )
below we will comment the tips and key points for each component.
please make sure to read following features , so you know what the difference between ours and other products . better spend 10 minutes here than spend additional weeks later and found out that other the one you got is with problems :)
we don't just sell them, we also provide good after-sales service, so welcome to discuss with us, we will try to do technical support as much as we can.
pleasefeel free to send us an email, we will also help you to complete the project !
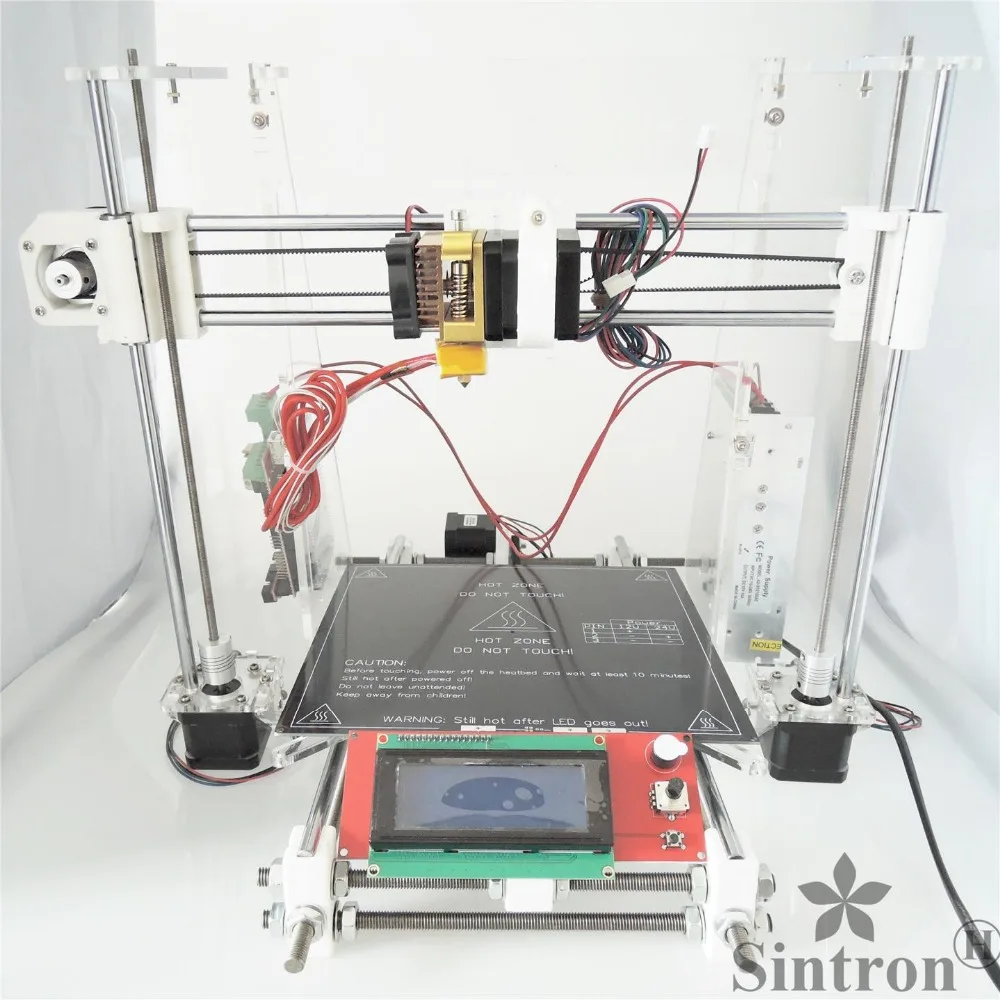
after you assemble them , below will be what you get .
(we have 2 directions for the extruder , both of them are ok to mount , default is to send it randomly)
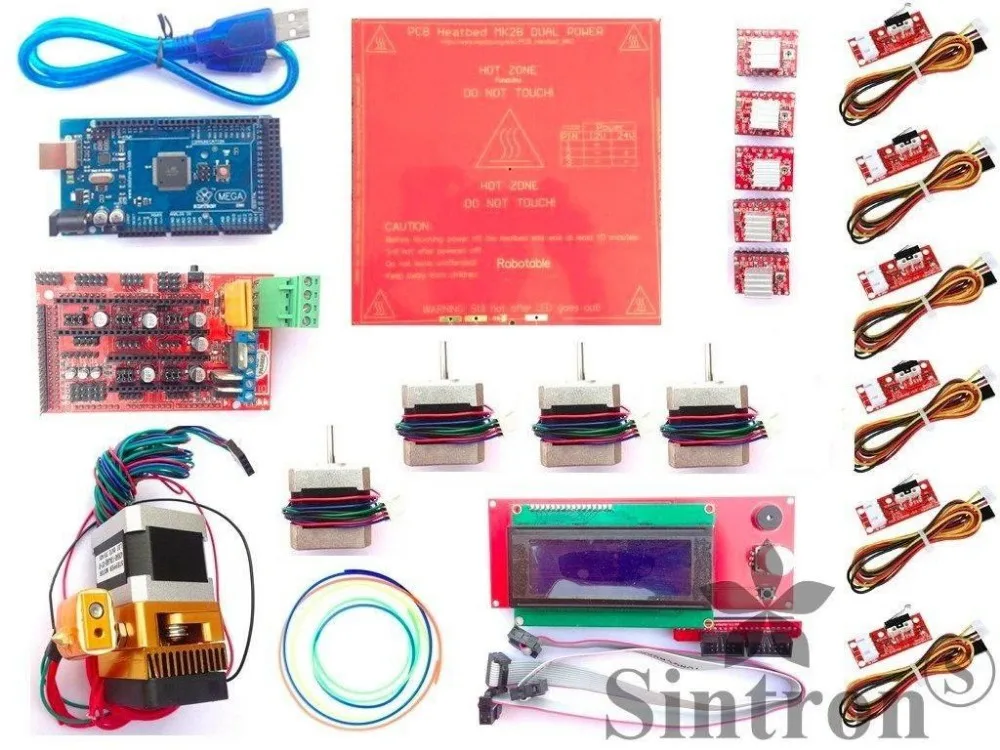
below are components you will get :
please notice : plastic parts have some standard error , so you might need to drill it with tools.
( and wade extruder plastic part won't be included as we will include a bowden extruder)
package list :
mechanical parts:
1. arcrylic frome kit ( screws & nuts included )
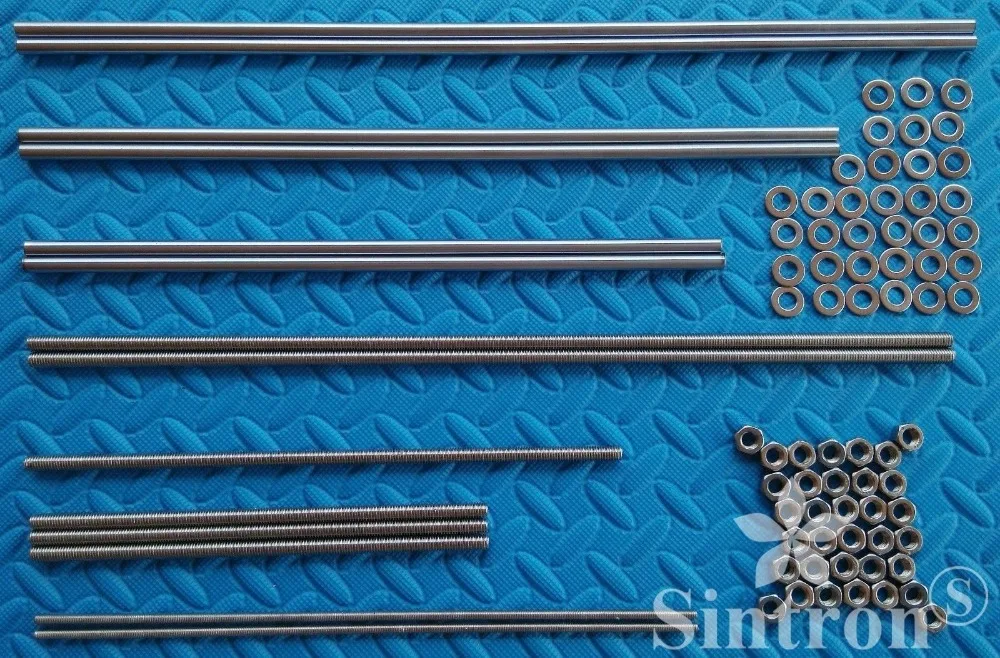
2. smooth and threaded kit ( nuts & washer included )
X Axis:
2x M8 8mm, length:405mm smooth rod
Y Axis:
2x M8 8mm, length:390mm smooth rod
2x M8 8mm, length:435mm threaded rod
3x M8 8mm, length:210mm threaded rod
1x M8 8mm, length:275mm threaded rod
Z Axis:
2x M8 8mm, length:330mm smooth rod
2x M5 5mm, length:305mm threaded rod
34x M8 nut
34x M8 washer
3. printed plastic kit , made of PLA. ( screws & nuts included )
please notice : plastic parts have some standard error , so you might need to drill it with tools.
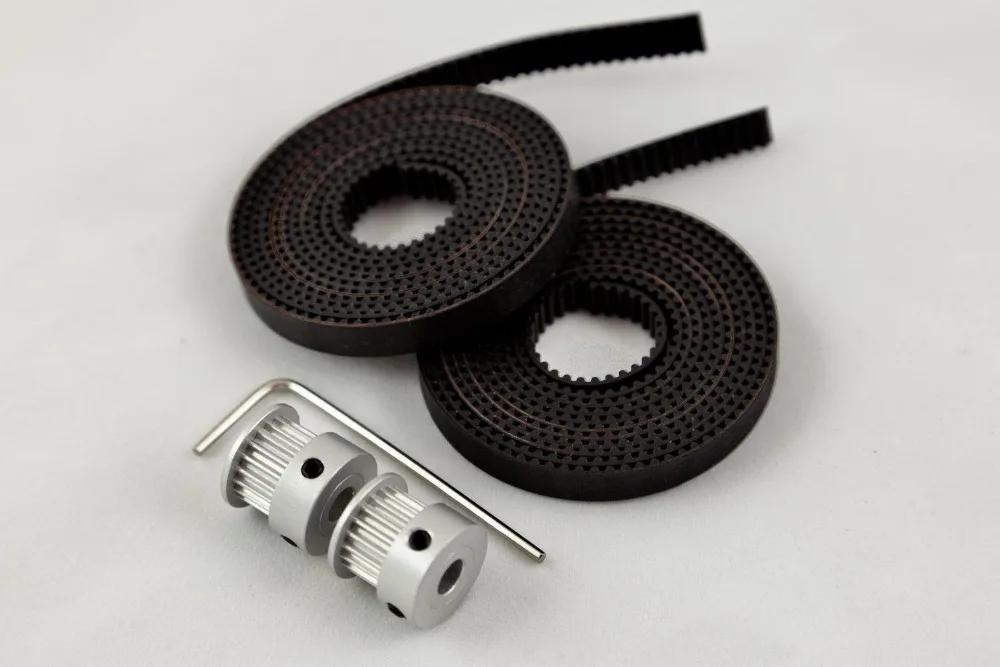
4. 2 pcs of GT2 pulley + GT2 2m belt. ( for x & y axis movement )
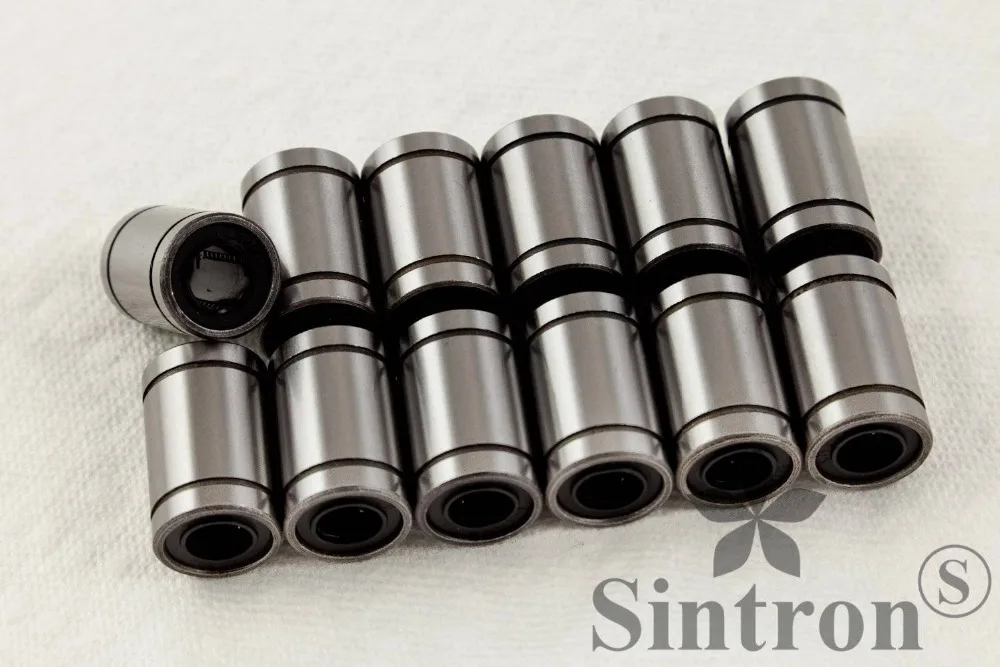
5. 12 pcs LM8UU bearings. ( for linear movement )
6. 4 pcs MF1045 bearings ( for belt )
7. 2 pcs coupling ( for z axis )
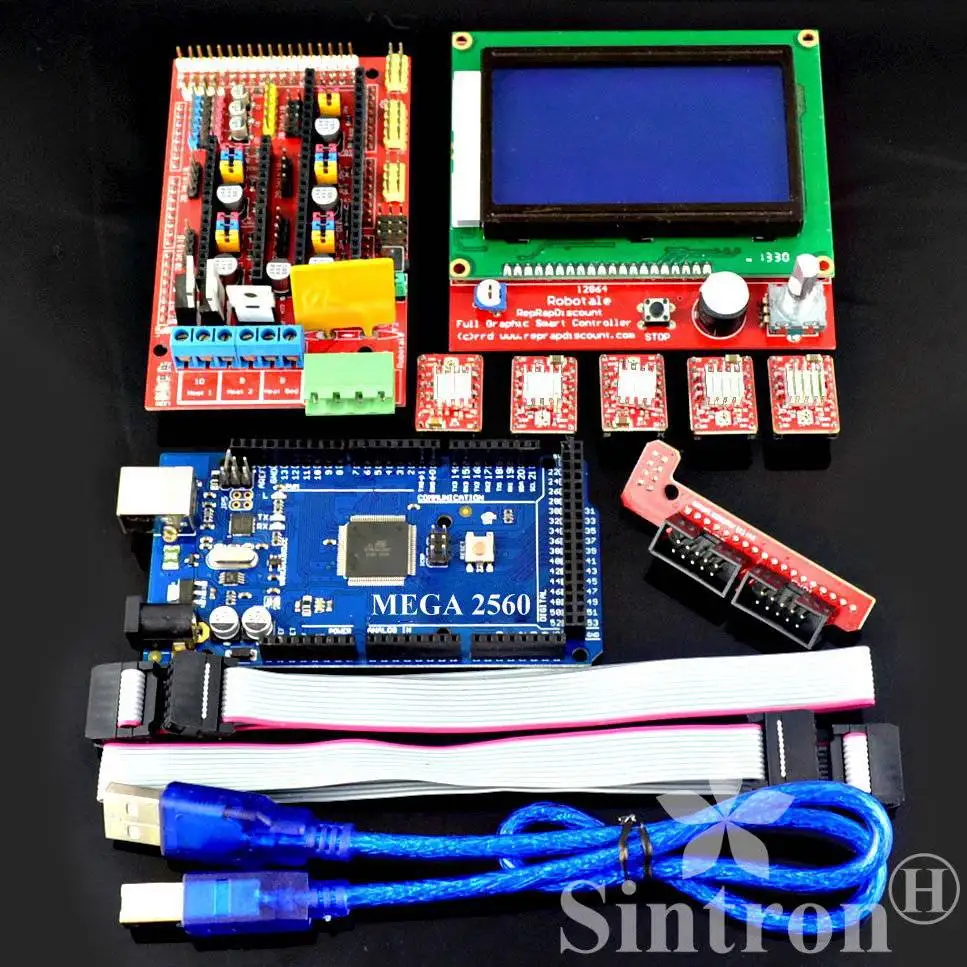
electronics parts :
8. 1 pcs ramps 1.4
9. 1 pcs arduino-compatible mega 2560 with USB cable
10. 5 pcs A4988 driver with heatsink
11. LCD 2004 controller
12. smart adapter + ribbon cable
13. MK8 extruder + hotend with Fan. ( default is for 1.75mm filament 0.4mm nozzle )
14. 6 pcs endstop with cable
15. 5 pcs Nema 17 motors ( one is already attached to MK8 extruder )
16. MK3 heat bed with springs
17. 12v 10A power supply (not pictured)
18. a bunch of nylon ties
Item Description and comment
(1) 3D Printer Controller RAMPS 1.4
while using Ramps 1.4 to heat the heatbed , the process is very easy to burn the MOSFET . so better to add additional fan for your ramps 1.4 , this could decrease the possibility a lot.
The RepRap Arduino-compatible MEGA Pololu Shield, or RAMPS for short. It is designed to fit the entire electronics needed for a RepRap in one small package for low cost. RAMPS interfaces an Arduino-compatible Mega with the powerful Arduino-compatible MEGA platform and has plenty room for expansion. The modular design includes plug in stepper drivers and extruder control electronics on an Arduino-compatible MEGA shield for easy service, part replacement, upgrade-ability and expansion. Additionally, a number of Arduino expansion boards can be added to the system as long as the main RAMPS board is kept to the top of the stack.
Version 1.4 uses surface mount capacitors and resistors to further cover edge issue cases.
Features
(1) USB type B receptacle.
(2) SD Card add on available.
(3) Fits 5 Pololu stepper driver board.
(4) LEDs indicate when heater outputs on.
(5) Expandable to control other accessories.
(6) Heated bed control with additional 11A fuse.
(7) Option to connect 2 motors to Z for Prusa Mendel.
(8) I2C and SPI pins left available for future expansion.
(9) It has provisions for the cartesian robot and extruder.
(10) All the Mosfets are hooked into PWM pins for versatility.
(11) 3 mosfets for heater / fan outputs and 3 thermistor circuits.
(12) Fused at 5A for additional safety and component protection.
(13) Pololu boards are on pin header sockets so they can be replaced easily or removed for use in future designs.
(14) Servo style connectors are used to connect to the endstops, motors, and leds. These connectors are gold plated, rated for 3A, very compact, and globally available.
Diagram
(2) Arduino-Compatible Mega 2560 R3
Fully compatible with original Arduino MEGA 2560 R3, with this product, you are able to use all the Arduino open source platform to create or learn interactive objects, it will be a lot of fun while you are creating and learning it, so just get this and start it, we also provide reference pdf files that can help you to improve skills very quickly. after all, time matters, the sooner you can improve your programing skills, the sooner you can create amazing projects!
Compared with UNO R3, this is with main Chip ATmega2560, with more I/O Pins, and additional 10 PWM output, of course, the EEPROM is also with larger space.
(3) 5 pcs of A4988 StepStick Compatible Stepper Motor Driver Module
A4988 is a complete microstepping motor driver with built-in translator for easy operation. This product is available in full, half, 1/4, 1/8 and 1/16 step modes operate bipolar stepper motors, output drive capacity of up to 35 V and ± 2 A. A4988 includes a fixed off-time current regulator, the regulator in slow or mixed decay modes. A4988 converter is the key to the easy implementation. As long as the "step" input inputting one pulse drives the motor one microstep. There are no phase sequence tables, high frequency control lines, or complex interfaces to program. A4988 interface is very suitable for complex microprocessor is unavailable or is overburdened.
In the micro-step operation, A4988 chopping control inside automatically selects the current decay mode (Slow or Mixed). In mixed decay mode, the device is initially set to a fixed downtime in some fast decay, then the rest of the slow decay downtime. Mixed decay current control scheme results in reduced audible motor noise, increased step accuracy, and reduced power consumption. Internal synchronous rectification control circuitry is provided to improve the pulse-width modulation (PWM) operation power consumption. Internal circuit protection includes: thermal shutdown with hysteresis, undervoltage lockout (UVLO), and crossover-current protection. Special power sequencing.
A4988 surface mount QFN package (ES), a size of 5 mm × 5 mm, nominal overall package height of 0.90 mm, with an exposed pad for enhanced thermal dissipation. This package is Pb (suffix-T), with 100% matte tin leadframe plating.
(4) LCD 2004 Smart Display Controller
This Smart Controller contains aSD-Card reader, a rotary encoder and a 20 Character x 4 Line LCD display. You can easy connect it to your Ramps board using the "smart adapter" included.
After connecting this panel to your Ramps you don't need your pc any more, the Smart Controller supplies power for your SD card. Further more all actions like calibration, axes movements can be done by just using the rotary encoder on the Smart Controller. Print your 3D designs without PC, just with a g-code design stored on the SD card.
(5) 5 pcs NEMA 17 1.8° 2.6 kg.cm flat shaft Stepper Motor
(6) MK8 extruder + hotend + fan + heatsink
Description :
what is thebenefitof our MK8 extruder + hotend? compared to normal J-head and others , this is with all metal structure .
1. if you mistakenly heat the hotend over 280degree. ( this is possible by the temperature sensor error ect.. ) , traditional J-head would be melted and got damaged forever , with this one , it is fine or you just need to replace a nozzle .
important noice about how to use it :
1. pleasealways keep the fan onwhile using it , otherwise it will get jammed ! especially when you use PLA , it will got Jammed right away in a few minutes soon . ( if unfortunately it got jammed , please contact us , we will teach you how to clean it )
make sure your gcode is with fan on settings automatically , or you can also turn it on manually.
(7) MK3 heater bed
The Alu-Heatbed MK3 have the featuressimilar to MK2 and you can also operate this board with 12V or 24V.
- Heatbed with 3.2mm Aluminum Core. Print directly on the heatbed, no need for glass plate. It's a much lighter solution than PCB heatbed + glass, which makes it better for faster prints.
- Dual power supply. Operate at 12V or 24V. You can use thinner wires when operating at 24V.
- A central mounting hole on the front side to allow for three point mounting. This is much easier for bed leveling in comparison to 4 point mounting. First level the side with two holes and fix in place, then level the side with one hole.
- Large solder pads for multiple wires (ribbon cable) or a SMD pinhead connector can be mounted.
- Pads for SMD thermistor 1206
Dimensions 214mm x 214mm
1 layer 35μm (1oz base) copper
Resistance between 1.4 and 1.6 ohm for the 12V
Resistance between 5.0 and 5.4 ohm for the 24V
100 degree Celsius possible for both 12V and 24V
With 15V on the 12V terminals will maintain approx. 115 degree Celsius without regulation
Running 24V on the 12V terminals will heatup the heatbed to 100 degree in only 2 minutes (Your printer controller will regulate the power to the heatbed in order to get your preset temperature.)
180 degree Celsius max. temperature
while using this , please make sure the heat bed resistance is between 1.4 ohm ~1.7 ohm
so you can make sure it won't burn your ramps 1.4 MOSFET
(8) 6 pcs of Mechanical End stops
Mechanical switches are less complicated to implement and cheaper than optical endstops . the function of endstops are to determine the original position of the extruder hotend , so it knows where to extrude the plastic material.
while using the Endstops , please be careful ! for the wrong connection , it's possible to burn the mega 2560 board !! basically you just need to connect the ground and signal wire , don't plug all 3 wires to ramps 1.4 together.
(9) Filament for test
in this kit , we also include some plastic Filament for you to test .
please notice : we will only send one random color , and this is only for test , not enough to print a 3D model.
We could provide more!!
below are 3 must get software and firmware:
1.Marlin: firmware to communicate all the parts.( we include the code you need )
2.Printrun: the software to communicate between 3D printer and computer.
3.Slic3r: final step to get the Gcode.( Gcode format is what you use to run your 3D printer )
Related Product :
Original Sanwa OBSF 30mm Round Snap Push Button For Arcade Game DIY Arcade Controller 7, Made in Japan. : Click Here Arcade JAMMA Card Edge Connector 56-Pin Solder Socket for 56-Pin JAMMA harness : Click Here Arcade JAMMA Card Edge Connector 56-Pin Solder Socket : Click Here


Comments
Post a Comment